Are you still using paper and pen for your inspection reports? Looking for a more professional way to create reports that you can email or text to your customers?
Our Inspection Module can help! Here is how it works:
Our Inspection Module can help! And you can use your mobile device! Here is how it works:Please note: Inspections is a feature of our Gold level subscription. If you would like to upgrade you can do so on your dashboard or speak with your Account Manager for more information.Getting Started1. Creating a New Inspection– Using the left-hand side Menu, click on Inspections and then on New Inspections to open a new inspection document:2. Add a Customer and Vehicle
– Click the plus sign (+) to add a New Customer or select an existing customer using the search bar.
– Click the plus sign (+) again to add or select the customer’s vehicle.
3. Select an Inspection Template
– On the Inspection bar, choose from the list of inspection templates you have created or see How to Create Inspection Templates, that can be created and tailored to your specific type of work and industry needs.
– Once you have selected the template, the system will auto-fill the Inspection section with the relevant information, and the Service Advisor details will be pulled from the Inspection Settings (please click here for more information).4. Complete the Inspection– Once you select the template, fill out the required group fields and types. Please note that all fields become mandatory once they are added to the template. See how Inspection Groups and Types are set up.https://staging.workshopsoftware.com/knowledge-base/inspections/create-an-inspection-group/– After working through the fields of your inspection, save the inspection when done by clicking the green Save button.– At this stage, if you would like to add any relevant photo or documentation, a new Attachment section will be visible after the Vehicle details section. See How to Attach a File onto your Workshop Software system.https://staging.workshopsoftware.com/knowledge-base/job-centre-invoicing/add-an-attachment-to-an-invoice/5. Inspection Approval– After saving the document, a reference number will be allocated to the Inspection and on the right-hand side, the Action button (☆) will appear, allowing you to Approve the Items to be fixed if you already have the service approved by the customer:– By clicking to Approve Items, a pop-up Inspection Approval window will list the items marked to be fixed, where one or more items can be selected for approval. After selecting the items, click Confirm and the inspection will have its status changed to Approved.Please note: The image below illustrates the Approved Inspection by the workshop. At any given time where the button is visible, you can share or print a document. In this case, the approved Inspection can be printed or sent out to the customer. An Inspection can also be sent via email to the customer requesting their approval, as explained below:Sharing the Inspection A more professional and reliable way to have your Inspections approved is by sending them out via email to the customers.1. Email the Inspection– After saving the Inspection following steps 1 to 4 described above, click the arrow button to send the Inspection via email to your customer.– A pop-up window will appear where you can freely write the email but you can also create templates for the email messages. Visit the following online article How you to Create a Template in Workshop Softwarehttps://staging.workshopsoftware.com/knowledge-base/settings/create-email-templates/if you would like to have your own templates.– Make sure to toggle the Requesting Approval option to YES if you need the customer’s approval and click on the Send to send the email to the customer.2. Customer Approval
– The customer will have received an email with a link to the Inspection and a Verification Code with the message or template used to send this email.
– By clicking on the link, the customer will be sent to the inspection details’ webpage where they will be able to approve the service by selecting the items they want to approve and by entering the Verification Code, then clicking to Confirm the operation.– Once the customer approves the job, on your Dashboard under the Inspections tab, the Approved section will list the recently received approvals, where their status is now changed to Approved.Please note that the Transaction Centre will also show the Inspections tab similar to the Dashboard, however, easier to reach and filter based on their status, whether a Draft, Approved or Requested Approval, Refused or Finalised.
Finalizing the Inspection
1. Finalize the Inspection– After approval, you can review the approved items listed on the document and, if an item was not approved this still can be reviewed and manually approved before Finalizing the document.– Click the Finalize button to complete this step.2. Convert the Inspection
– Once the inspection has its status changes to Finalised. You can then convert the inspection into a Booking or an Invoice with all details included.
Additional Features
–The Inspection Module is optimized for tablets and mobile devices, making it easy to use on the go. You can access saved inspections from the Transaction Centre on the Dashboard, and the status of each inspection is updated in real-time, so you can always track the progress! Please see below Related Articles that will help you using this amazing feature!
Our Inspection Module streamlines your inspection process, making it faster and more efficient. Try it out today and improve your communication with customers!
Are you still doing your inspections report with paper and pen? Are you looking for a more professional report that you can email/text to your customers?
What if they could approve the urgent work from the report & you get notified of the approval?
What if you could attach photo evidence to the report too?
Watch this demo to discover how the Auto Inspect tool works and and see how it offers you a more effective way to communicate with your customer and win you more business.
 Skip to content
  2. Add a Customer and Vehicle
– Click the plus sign (+) to add a New Customer or select an existing customer using the search bar.
– Click the plus sign (+) again to add or select the customer’s vehicle.
3. Select an Inspection Template
– On the Inspection bar, choose from the list of inspection templates you have created or see How to Create Inspection Templates, that can be created and tailored to your specific type of work and industry needs.
2. Add a Customer and Vehicle
– Click the plus sign (+) to add a New Customer or select an existing customer using the search bar.
– Click the plus sign (+) again to add or select the customer’s vehicle.
3. Select an Inspection Template
– On the Inspection bar, choose from the list of inspection templates you have created or see How to Create Inspection Templates, that can be created and tailored to your specific type of work and industry needs.
 – Once you have selected the template, the system will auto-fill the Inspection section with the relevant information, and the Service Advisor details will be pulled from the Inspection Settings (please click here for more information).
  4. Complete the Inspection – Once you select the template, fill out the required group fields and types. Please note that all fields become mandatory once they are added to the template. See how Inspection Groups and Types are set up. https://staging.workshopsoftware.com/knowledge-base/inspections/create-an-inspection-group/
– After working through the fields of your inspection, save the inspection when done by clicking the green Save button.
– At this stage, if you would like to add any relevant photo or documentation, a new Attachment section will be visible after the Vehicle details section. See How to Attach a File onto your Workshop Software system.https://staging.workshopsoftware.com/knowledge-base/job-centre-invoicing/add-an-attachment-to-an-invoice/ 5. Inspection Approval – After saving the document, a reference number will be allocated to the Inspection and on the right-hand side, the Action button (☆) will appear, allowing you to Approve the Items to be fixed if you already have the service approved by the customer:
4. Complete the Inspection – Once you select the template, fill out the required group fields and types. Please note that all fields become mandatory once they are added to the template. See how Inspection Groups and Types are set up. https://staging.workshopsoftware.com/knowledge-base/inspections/create-an-inspection-group/
– After working through the fields of your inspection, save the inspection when done by clicking the green Save button.
– At this stage, if you would like to add any relevant photo or documentation, a new Attachment section will be visible after the Vehicle details section. See How to Attach a File onto your Workshop Software system.https://staging.workshopsoftware.com/knowledge-base/job-centre-invoicing/add-an-attachment-to-an-invoice/ 5. Inspection Approval – After saving the document, a reference number will be allocated to the Inspection and on the right-hand side, the Action button (☆) will appear, allowing you to Approve the Items to be fixed if you already have the service approved by the customer:  – By clicking to Approve Items, a pop-up Inspection Approval window will list the items marked to be fixed, where one or more items can be selected for approval. After selecting the items, click Confirm and the inspection will have its status changed to Approved.
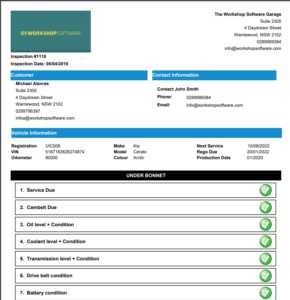
  Please note: The image below illustrates the Approved Inspection by the workshop.
 At any given time where the button
  2. Customer Approval
– The customer will have received an email with a link to the Inspection and a Verification Code with the message or template used to send this email.
2. Customer Approval
– The customer will have received an email with a link to the Inspection and a Verification Code with the message or template used to send this email.  – By clicking on the link, the customer will be sent to the inspection details’ webpage where they will be able to approve the service by selecting the items they want to approve and by entering the Verification Code, then clicking to Confirm the operation.
  – Once the customer approves the job, on your Dashboard under the Inspections tab, the Approved section will list the recently received approvals, where their status is now changed to Approved. Please note that the Transaction Centre will also show the Inspections tab similar to the Dashboard, however, easier to reach and filter based on their status, whether a Draft, Approved or Requested Approval, Refused or Finalised.

 What if they could approve the urgent work from the report & you get notified of the approval?
What if you could attach photo evidence to the report too?
Watch this demo to discover how the Auto Inspect tool works and and see how it offers you a more effective way to communicate with your customer and win you more business.
What if they could approve the urgent work from the report & you get notified of the approval?
What if you could attach photo evidence to the report too?
Watch this demo to discover how the Auto Inspect tool works and and see how it offers you a more effective way to communicate with your customer and win you more business.
