 Skip to content
 Integrating Xero with Workshop Software connects the two systems so that invoices, payments, and customer data flow automatically from Workshop Software into Xero. This guide walks you through the initial setup process and provides a reference for account mapping.
Step 1: Open the Integrations Settings
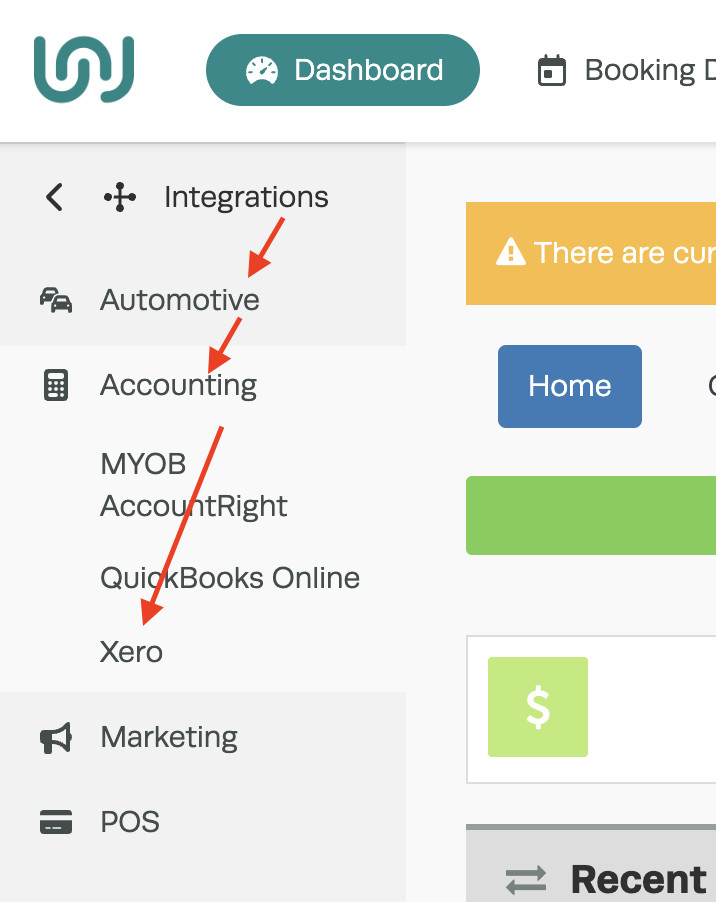
- In Workshop Software, click on Integrations from the left-hand navigation menu.
- Click on the Xero option to begin the setup.
Step 2: Authorise the Connection
- Click the green Authorise button on the right-hand side of the page. This allows Workshop Software to access your Xero account.

Step 3: Log In to Xero
- Enter your Xero login details when prompted.

Step 4: Grant Access
- Click the green Authorise button to confirm that Workshop Software can access your Xero data.

Step 5: Map Your Accounts
- Match the accounts in Workshop Software with the appropriate general ledger accounts from your Xero chart of accounts.
- See the Account Mapping Reference section below for details on each account.

Step 6: Start Syncing
- You are now ready to sync. Click the Lightining Bolt icon at the top-right of the page then click ‘Sync Xero’ to trigger your first sync.
- Once the initial sync is complete, invoicing information will flow from Workshop Software to Xero automatically.

Xero Integration Reference
The section below provides important reference information about how the Xero integration works, including sync behaviour, limitations, and best practices.
Integration Fact Sheet
Important: Invoices and payments will not sync to Xero until they have been PROCESSED.
Once integrated, everything should be entered into Workshop Software. Make sure your customers and suppliers are entered in Workshop Software before completing the integration. Have them all entered or imported into one system, then complete your integration.
Invoices for both customers and suppliers will only flow from Workshop Software to Xero. This includes customer invoices, supplier invoices, payments, and credits.
Note: Nothing voided in Xero syncs back to Workshop Software.
When deciding to change an integration from one accounting package to another, please contact support@workshopsoftware.com as this needs to be done carefully.
If you have previously had an import of contacts (customers) or suppliers completed and have the same customers or suppliers in Xero, duplicates may be created during the initial sync.

Parts do not integrate from Xero into Workshop Software and they are not tracked via Xero — only Workshop Software. You can import parts once exported from Xero into Workshop Software. Please contact support@workshopsoftware.com for importing assistance.
Account Mapping Reference
During the initial integration, you will be asked to map Workshop Software accounts to your Xero chart of accounts. Below is what each account means and which Xero account type it requires.
Sales Accounts
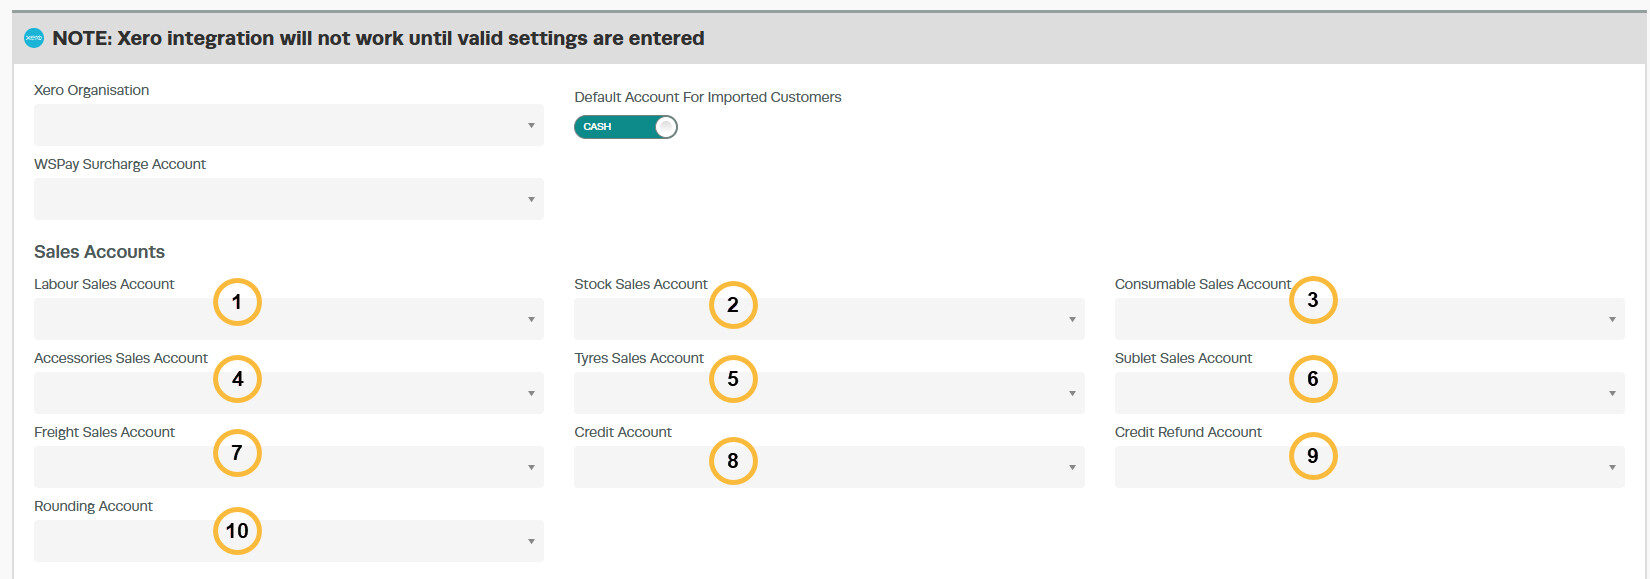
- Labour Sales Account — Must be a Sales or Revenue account
- Stock Sales Account — Must be a Sales or Revenue account
- Consumable Sales Account — Must be a Sales or Revenue account
- Accessories Sales Account — Must be a Sales or Revenue account
- Tyre Sales Account — Must be a Sales or Revenue account
- Sublet Sales Account — Must be a Sales or Revenue account
- Freight Sales Account — Must be a Sales or Revenue account
- Credit Account — Must be a Sales or Revenue account
- Credit Refund Account — Must be an Equity, Current Liability, or Bank account
- Rounding Account — Must be a Sales or Revenue account
Purchase Accounts
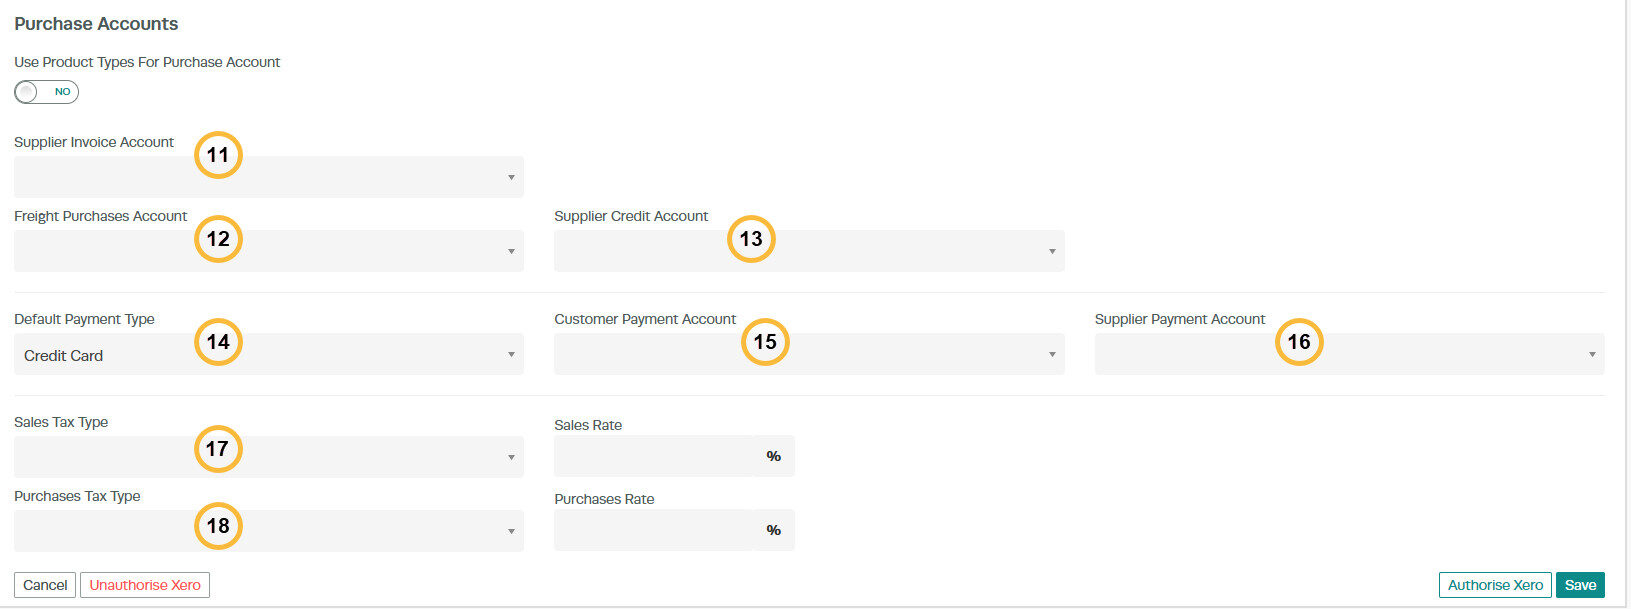
- Supplier Invoice Account — Must be an Expense account
- Freight Purchases Account — Must be an Expense account
- Supplier Credit Account — Must be an Expense account
- Default Payment Type — Can be Cash, Credit Card, or Direct Deposit
- Customer Payment Account — Must be an Equity, Current Liability, or Bank account
- Supplier Payment Account — Must be an Equity, Current Liability, or Bank account
- Sales Tax Type — Usually GST on Income
- Purchases Tax Type — Usually GST on Expenses
Xero Account Codes
Important: All accounts in Xero must have account codes assigned. If an account is missing a code, it will not appear in the Workshop Software mapping dropdown.

To fix a missing account code in Xero:
- Log into Xero.
- Go to Settings then Chart of Accounts.
- Click on the account that is missing a code.
- Update the Code field and click Save.

Good to Know
- Make sure you click Save after making your changes. If you navigate away before saving, your changes will be lost.
- If you experience any issues with the integration, contact the Workshop Software support team for assistance.
Frequently Asked Questions
What do I do if the integration is not working?
First, check that your credentials are entered correctly and that both systems are accessible. If the issue persists, check the event log in Workshop Software for specific error messages, or contact the Workshop Software support team for assistance.
Can I disconnect this integration later?
Yes. You can disable or disconnect the integration at any time through the integration settings. Disconnecting does not delete any data that has already been synced.
